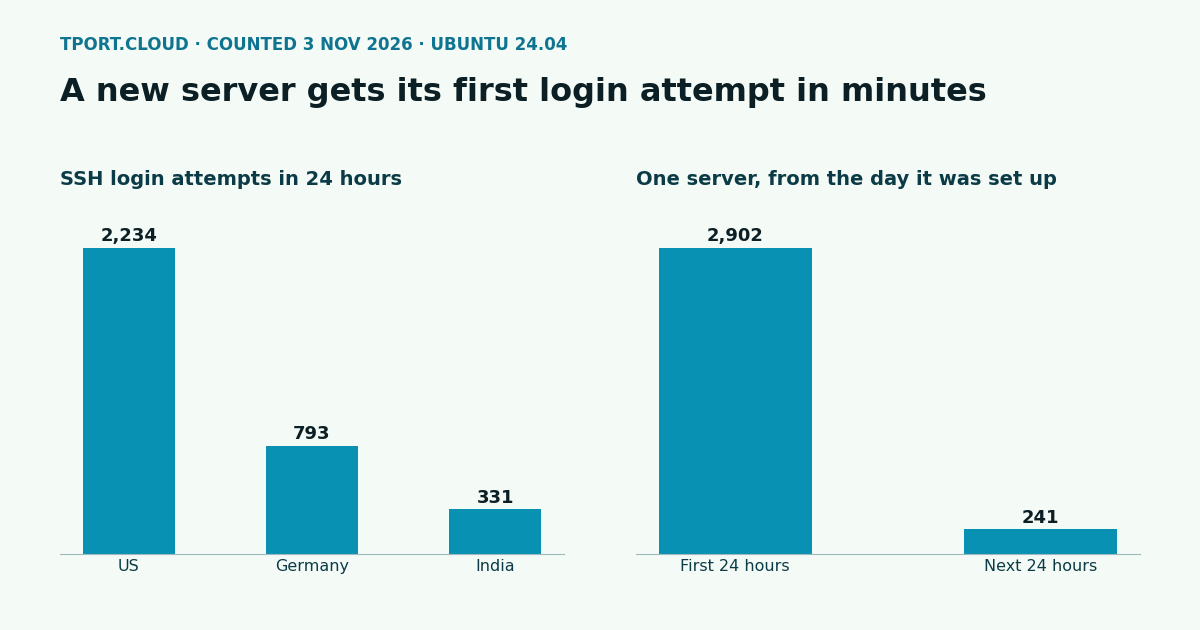
We read 24 hours of SSH logs on three public servers we run. They took 3,358 login attempts between them, about 1,100 per server per day, from 85 to 155 different addresses each. On the server we set up most recently, the first attempt came 5 minutes 40 seconds after its logs began. None of this needs anyone to know your server exists: bots scan every public address all day.
This guide locks a new Ubuntu 24.04 server down in the order that can't lock you out: a sudo user, then the firewall, then SSH, then fail2ban. We ran every command on a clean Ubuntu 24.04.5 server (1 vCPU, 2 GB, kernel 6.8) on 3 November 2026, with a second server attacking it, and we kept the two traps we found: an SSH config file whose name decides whether it works, and a fail2ban default that ignores most of what bots do on a key-only server.
What 24 hours of attacks looks like
These are the 24 hours up to about 01:20 UTC on 3 November 2026. All three servers already had password login off and fail2ban on, so nothing got in. "Attempts" counts connections that gave up at the login stage; a bot can't even try a password once the server only offers keys.
| Server | Login attempts | As root | As a made-up user | Different addresses | fail2ban bans |
|---|---|---|---|---|---|
| US | 2,234 | 1,511 | 573 | 155 | 13 |
| Germany | 793 | 551 | 126 | 132 | 38 |
| India | 331 | 296 | 105 | 85 | 9 |
The columns come from different log lines, so they don't add up exactly. Two things stand out. Root is the top target by far, which is why root login goes off below. And the attacks are spread out: dozens of addresses, a few tries each, so bans only slow this down. It's the keys that stop it.
The most tried usernames across the three servers, not counting root:
| Username | Tries in 24 hours |
|---|---|
| admin | 153 |
| r00t | 24 |
| user | 16 |
| test | 13 |
| debian | 11 |
| oracle | 8 |
| sammy | 7 |
| ftpuser | 6 |
The India server also shows how a new address gets found. It took 2,902 attempts from 95 addresses in its first 24 hours from 31 October, then 241 the next day and 331 by 3 November. We can't say why the first day was the loudest, but it's a good reason to do this before anything else, not at the end of the week.
One limit of this data: we won't open password login on a public server to count what happens, so we have no "before" column. What we can tell you from the test below is what password login being off looks like to a client.
What it costs
| Measure | Result |
|---|---|
| Memory used, clean server | 288 MB of 2 GB |
| Memory used, after all steps and a reboot | 312 MB |
| fail2ban process | 33 MB |
| Disk | 240 MB more, including package lists |
| fail2ban install time | 47 s, including apt-get update |
Step 1: a sudo user with your key
Log in as root and leave that session open until the end of the guide. It's your way back if something goes wrong. Then make a user and give it your key. If your provider logged you in as ubuntu, it's already your sudo user and you can skip this.
No password means sudo can't ask for one, so this rule skips the prompt. The key then is what protects the account, so guard it, and put a passphrase on it. From your own computer, in a new terminal:
Don't go on until that prints both lines.
Step 2: the firewall, with SSH allowed first
ufw is installed on Ubuntu but off. Allow SSH before you turn it on. Add anything else you serve now, such as ufw allow 80,443/tcp.
Check from your own computer that SSH still works and that the rest is closed. From our second server with nmap:
Docker ignores these rules for published ports, which we tested and fixed in the Docker guide.
Step 3: SSH keys only, and the file name trap
Ubuntu's SSH reads the files in /etc/ssh/sshd_config.d/ in name order, and the first value it finds for a setting wins. Images from different places ship their own files here, and some have a 50-cloud-init.conf with PasswordAuthentication yes. We tried it:
| Files in sshd_config.d | sshd -T says |
|---|---|
50-cloud-init.conf (yes) and 99-hardening.conf (no) | passwordauthentication yes, your setting is ignored |
00-hardening.conf (no) and 50-cloud-init.conf (yes) | passwordauthentication no |
So name yours to sort first:
sshd -T prints what the server will really use, so trust it over reading the files. Your root session stays open through the reload. Now test from a new terminal before you close anything:
Prove password login is off
Don't take the config's word for it. Ask the server which methods it offers, with no key in play:
If you see password in either answer, it isn't off. We went one step further: we gave the deploy user a real password and tried it with sshpass. The right password got Permission denied (publickey), so we removed the password and locked it again.
Step 4: fail2ban, with the setting that matters
Ubuntu's package turns on an SSH jail by itself, with a 10 minute ban after 5 failures. But the default filter mode doesn't count what bots do on a key-only server. We attacked our test server 12 times in a row with a wrong key, starting fresh for each line:
| Filter mode | Target user | Failures counted | Banned? |
|---|---|---|---|
| normal (default) | root | 0 | No |
| normal (default) | admin (doesn't exist) | 9 | Yes |
| aggressive | root | 31 | Yes |
| aggressive | admin (doesn't exist) | 31 | Yes |
Root is the most tried name in our logs, and the default mode ignored all 12 of those attempts. So set mode = aggressive, and use longer bans that grow for repeat visitors:
Add your own fixed IP to ignoreip if you have one. A failed key at home can ban you too. Your open root session keeps working during a ban, and this gets you back in:
Prove it bans
From a second server, not your own computer, try a few logins with a user that doesn't exist. With these settings, on mode = aggressive, each attempt counted twice, so ours was banned on the third try and got this from then on:
That's the other small surprise: on Ubuntu 24.04 the package bans through nftables, so iptables -S shows nothing and you may think it failed.
Step 5: reboot, and check it all again
All of them held on our test server. Next come automatic security updates, and if you've got private services to reach, a WireGuard VPN lets you close SSH to the world altogether.
Which of our servers can run this
All of them, every step. We ran ufw on a server under $20 and it works there too. On those servers your public SSH port isn't 22: use the one the console shows you, and ufw allow OpenSSH is still right, because the port on the inside is 22. If you ordered with a password instead of an SSH key, put your key on the server first, because step 3 turns passwords off.
Sources
Our own run on Ubuntu 24.04.5, kernel 6.8.0-147, QEMU/KVM, fail2ban 1.0.2, 3 November 2026. Attack counts are from the ssh journal of three public servers we run, read on 3 November 2026; the first 24 hours are the India server's from 31 October. Docs: sshd_config manual (first value wins), ufw manual, fail2ban on GitHub.
Pick a region and a budget and see your best servers, all on Ubuntu 24.04 and ready for these steps.
See the servers