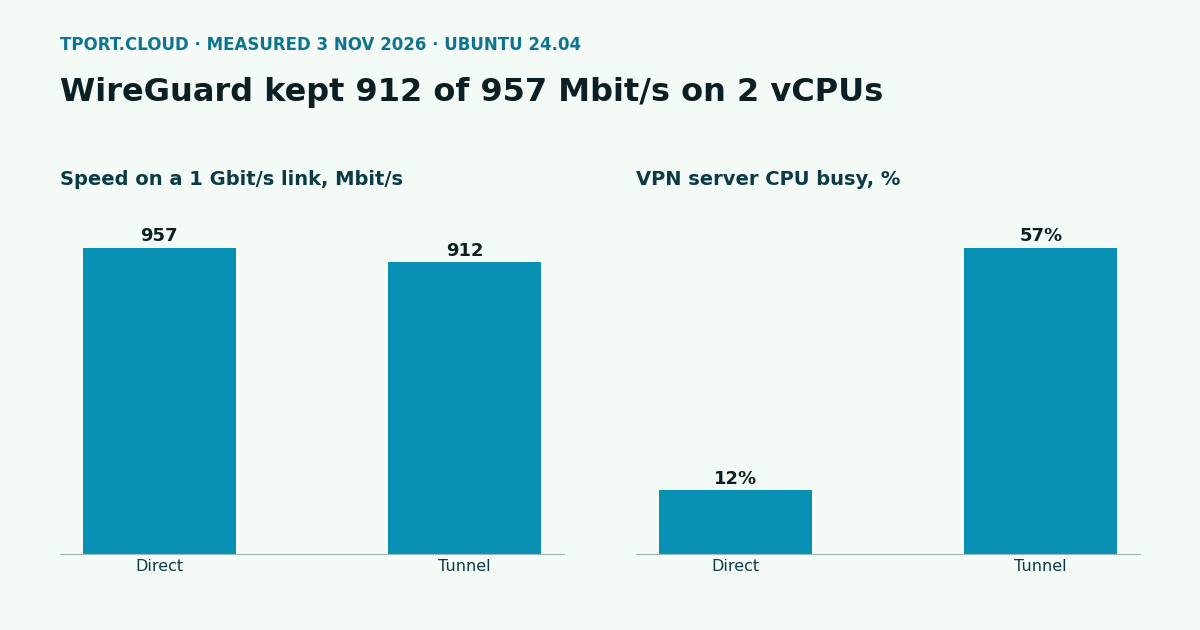
On a 1 Gbit/s link, a 2 vCPU WireGuard server carried 912 Mbit/s against 957 Mbit/s with no tunnel. The price was CPU: the server went from 12% busy to 57% during that transfer. It added nothing we could measure to memory and 1 MB to the disk, and after a reboot the laptop's tunnel was back in 19 seconds. This guide sets up that VPN, then closes SSH so only VPN users can reach it, with a safety net in case that locks you out.
We ran every step on 3 November 2026 on clean Ubuntu 24.04.5 with kernel 6.8, using test machines on one private network. So the speed figures show what the server can do, not what your internet connection will. A real link has more delay and some packet loss.
What it costs
| Measured | No tunnel | WireGuard |
|---|---|---|
| Speed, 1 Gbit/s link (6 runs of 15 s each) | 957 Mbit/s | 912 Mbit/s (892 to 917) |
| VPN server CPU busy at that speed, 2 vCPU | 12% | 57% |
| Laptop CPU busy at that speed, 2 vCPU | 5% | 66% |
| Speed, no link limit (6 runs of 15 s each) | 27 Gbit/s | 2.85 Gbit/s |
| Average ping, 3 rounds of 30 | 2.5 ms | 4.5 ms |
| Other costs | Result |
|---|---|
| Install | 7.7 s, 1 MB of disk |
| Memory | No change we could measure (387 MB used before and after); the kernel module is 112 KB |
| Starting the tunnel | 0.25 s |
| Keeping an idle tunnel open | About 300 KB a day, worked out from 130 s of counters |
The 2.85 Gbit/s is the limit for these 2 vCPUs on a desktop-class Intel CPU, so plan for about that at most on similar hardware. Treat the ping gap as rough: our idle test machines were noisy, with direct pings alone averaging from 1.9 to 2.8 ms.
Step 1: install on both ends
Do this on the server and on your Linux laptop. The kernel already includes WireGuard, so this only adds the tools.
Step 2: make a key pair on each end
Each machine makes its own private key, and only the public key is ever copied across.
The last line printed is that machine's public key. Note both of them.
Step 3: configure the server
Find the name of your public network interface with ip route show default: it's the word after dev. We use eth0 below, so change it if yours differs. If you need the firewall basics first, see our hardening guide.
Step 4: configure the laptop
AllowedIPs here decides what goes through the tunnel: only the VPN's own addresses so far, while everything else on your laptop goes out as usual. Keep PersistentKeepalive: the server doesn't know where your laptop is until the laptop speaks, so this is what brought the tunnel back by itself after a server reboot. We only tested a Linux client. The official apps for other systems use this same file format.
One thing that looks wrong but isn't: a port scan of 51820 shows open|filtered, whether or not anything is there. WireGuard doesn't answer anyone who lacks a valid key, so a stranger can't tell it's running.
Step 5: close SSH to everyone outside the VPN
Do these in this order, as a mistake here can lock you out. First allow SSH over the VPN, and prove it works from the laptop:
Only when that login works, set a timer that reopens SSH in 10 minutes, then close the public door. Stay logged in to your existing session while you test.
Open a new terminal and log in over the VPN again. If it works, cancel the timer. If you can't get in, wait 10 minutes and the public door comes back by itself.
| We checked from the laptop | Result |
|---|---|
| Public address, port 22, before | Open, login works |
| Session opened before the change | Stays connected, so your open terminal is safe |
| Public address, port 22, after | Filtered, new logins time out |
| VPN address, port 22, after | Open, login works |
| VPN address with the tunnel down | Filtered |
| Reopen timer left to run (90 s in our test) | Port 22 open again when it fired |
| Reopen timer cancelled | Port 22 stayed closed |
| Server rebooted | Tunnel back in 19 s, VPN login works, public port 22 still filtered |
After this, a broken tunnel means no SSH at all. Keep a copy of the laptop's config somewhere safe, and add a second device as below so one lost laptop doesn't lock you out.
Step 6: reach other private servers through it
If the VPN server has a private network to your other servers, here 192.168.85.0/24 on eth1, you can reach them with no changes on those servers. The PostUp rule makes the traffic look as if it comes from the VPN server, and our private server had no route back to the VPN at all. In the server's file, add a second PostUp and PostDown pair with -o eth1, then add one firewall rule and one laptop setting:
Don't test this with ping alone. Before we added the ufw route rule, ping to the private server worked, but its SSH port showed as filtered. Ubuntu's default ufw rules let ping through forwarding with no rule at all, so a working ping proves little. Test the port you actually need:
With no link limit, this route carried 1.43 Gbit/s to the private server. That's lower than the 2.85 Gbit/s to the VPN server itself, because in our test the server was also sending the traffic back out through the same network card.
Step 7: add and remove devices without a restart
Generate a key on the new device, give it the next address, then add it on the server. Restarting would drop everyone, while syncconf doesn't:
To remove a device, delete its block from the file and run the same wg syncconf line. In our test the new device connected right away, and once removed it got no replies at all. A ping running on the first laptop through both changes had 0 lost out of 100.
Optional: send all your traffic through it
For public Wi-Fi, you can send everything through the server. Allow forwarding to the internet on the server with ufw route allow in on wg0 out on eth0, then change two lines in the laptop's file:
It worked in our test: traffic to the internet went through the tunnel, and DNS was set on the tunnel. Ubuntu's built-in resolvconf handles the DNS line, so nothing extra is needed there.
That setting only covers IPv4. With it on, the route to an IPv6 address still went out through our normal network card, outside the tunnel. If your network has IPv6, that traffic isn't protected. WireGuard's answer is to add ::/0 to AllowedIPs and give the tunnel IPv6 addresses, but we didn't test that.
Which of our servers can run this
| Server | VPN server? | What we saw |
|---|---|---|
| $20 a month and up | Yes, every step | Your own kernel, and the numbers above come from this kind of setup |
| Under $20 | No | WireGuard installs and starts, but over IPv4 only your SSH port is reachable from outside for now, so no laptop can reach 51820/udp. Two of these servers pointed at each other got no replies either: 296 bytes sent, 0 received |
A server under $20 connecting out to a VPN server elsewhere might work, but we didn't test that, so don't rely on it. Also, it's the CPU figure above that should guide your size: at 1 Gbit/s, this used more than half of 2 vCPUs, so leave room if the same server has other work to do.
Sources
Our own runs on Ubuntu 24.04.5, kernel 6.8.0-147, 3 November 2026: wireguard-tools 1.0.20210914, iperf3, nmap. Three QEMU/KVM machines on one Linux bridge: VPN server with 2 vCPU and 4 GB, laptop with 2 vCPU and 1 GB, private server with 1 vCPU and 1 GB, on a 12th Gen Intel desktop CPU. The public and private networks were two address ranges on that bridge. The 1 Gbit/s link was a traffic limit on both network cards, so it had no real-world delay or loss. Tests of direct and tunnel speed took turns. An earlier run on a slower virtual network showed the tunnel at half speed with the CPUs mostly idle, which pointed to that network rather than WireGuard, so we dropped those speed figures. We used that run's install, memory, idle traffic, device, SSH and reboot results, as speed doesn't affect them. Small server limits were tested the same day on 2 vCPU, 4 GB and 30 GB. Docs: WireGuard quick start, wg-quick(8), ufw manual, systemd-run.
Run your VPN on a server with its own kernel.
See the servers